EditReady 22.2: Color Awareness, precision color pipeline, Sony RAW & X-OCN


The advent of HDR, RAW video, and wider colorspaces mean that post-production workflows are dramatically better at dealing with high-end images today than they were a decade ago. That in itself is awesome. But for post-professionals to make the most of the myriad of technical and creative choices it brings, they need better software. Software that has "awareness" of color workflows, understanding the possibilities while remaining simple to use even in the most stressful projects.
Color Awareness
When a shoot mixes camera formats, you'll end up with a variety of color spaces, Log types, HDR formats, and LUTs. It's just too easy to make mistakes. You might not notice a single, subtle error, but they can add up to a project that's just "off" for no obvious reason. Typically these errors don't get caught until late in the production chain (grading, conforming, etc.) - when time's tightest and costs are at their peak. With EditReady, we want to make sure you don't end up there.
The clue's in the name: we've always focused on getting bulky camera footage into an NLE in a shape and form optimized for the job. So we take your camera media and convert it into a "mezzanine" format - a single codec like ProRes or DNx that preserves its visual quality without the overhead of big and unwieldy camera files.
Color Conversion panel
With the release of EditReady 22.2, our new Color Conversion panel takes this philosophy into the color domain, giving you choices where you need to make them, and making sensible decisions where you don't - or where you're simply too flat out to worry about it. It's all about giving you control; watching your back when you're busy watching something else.
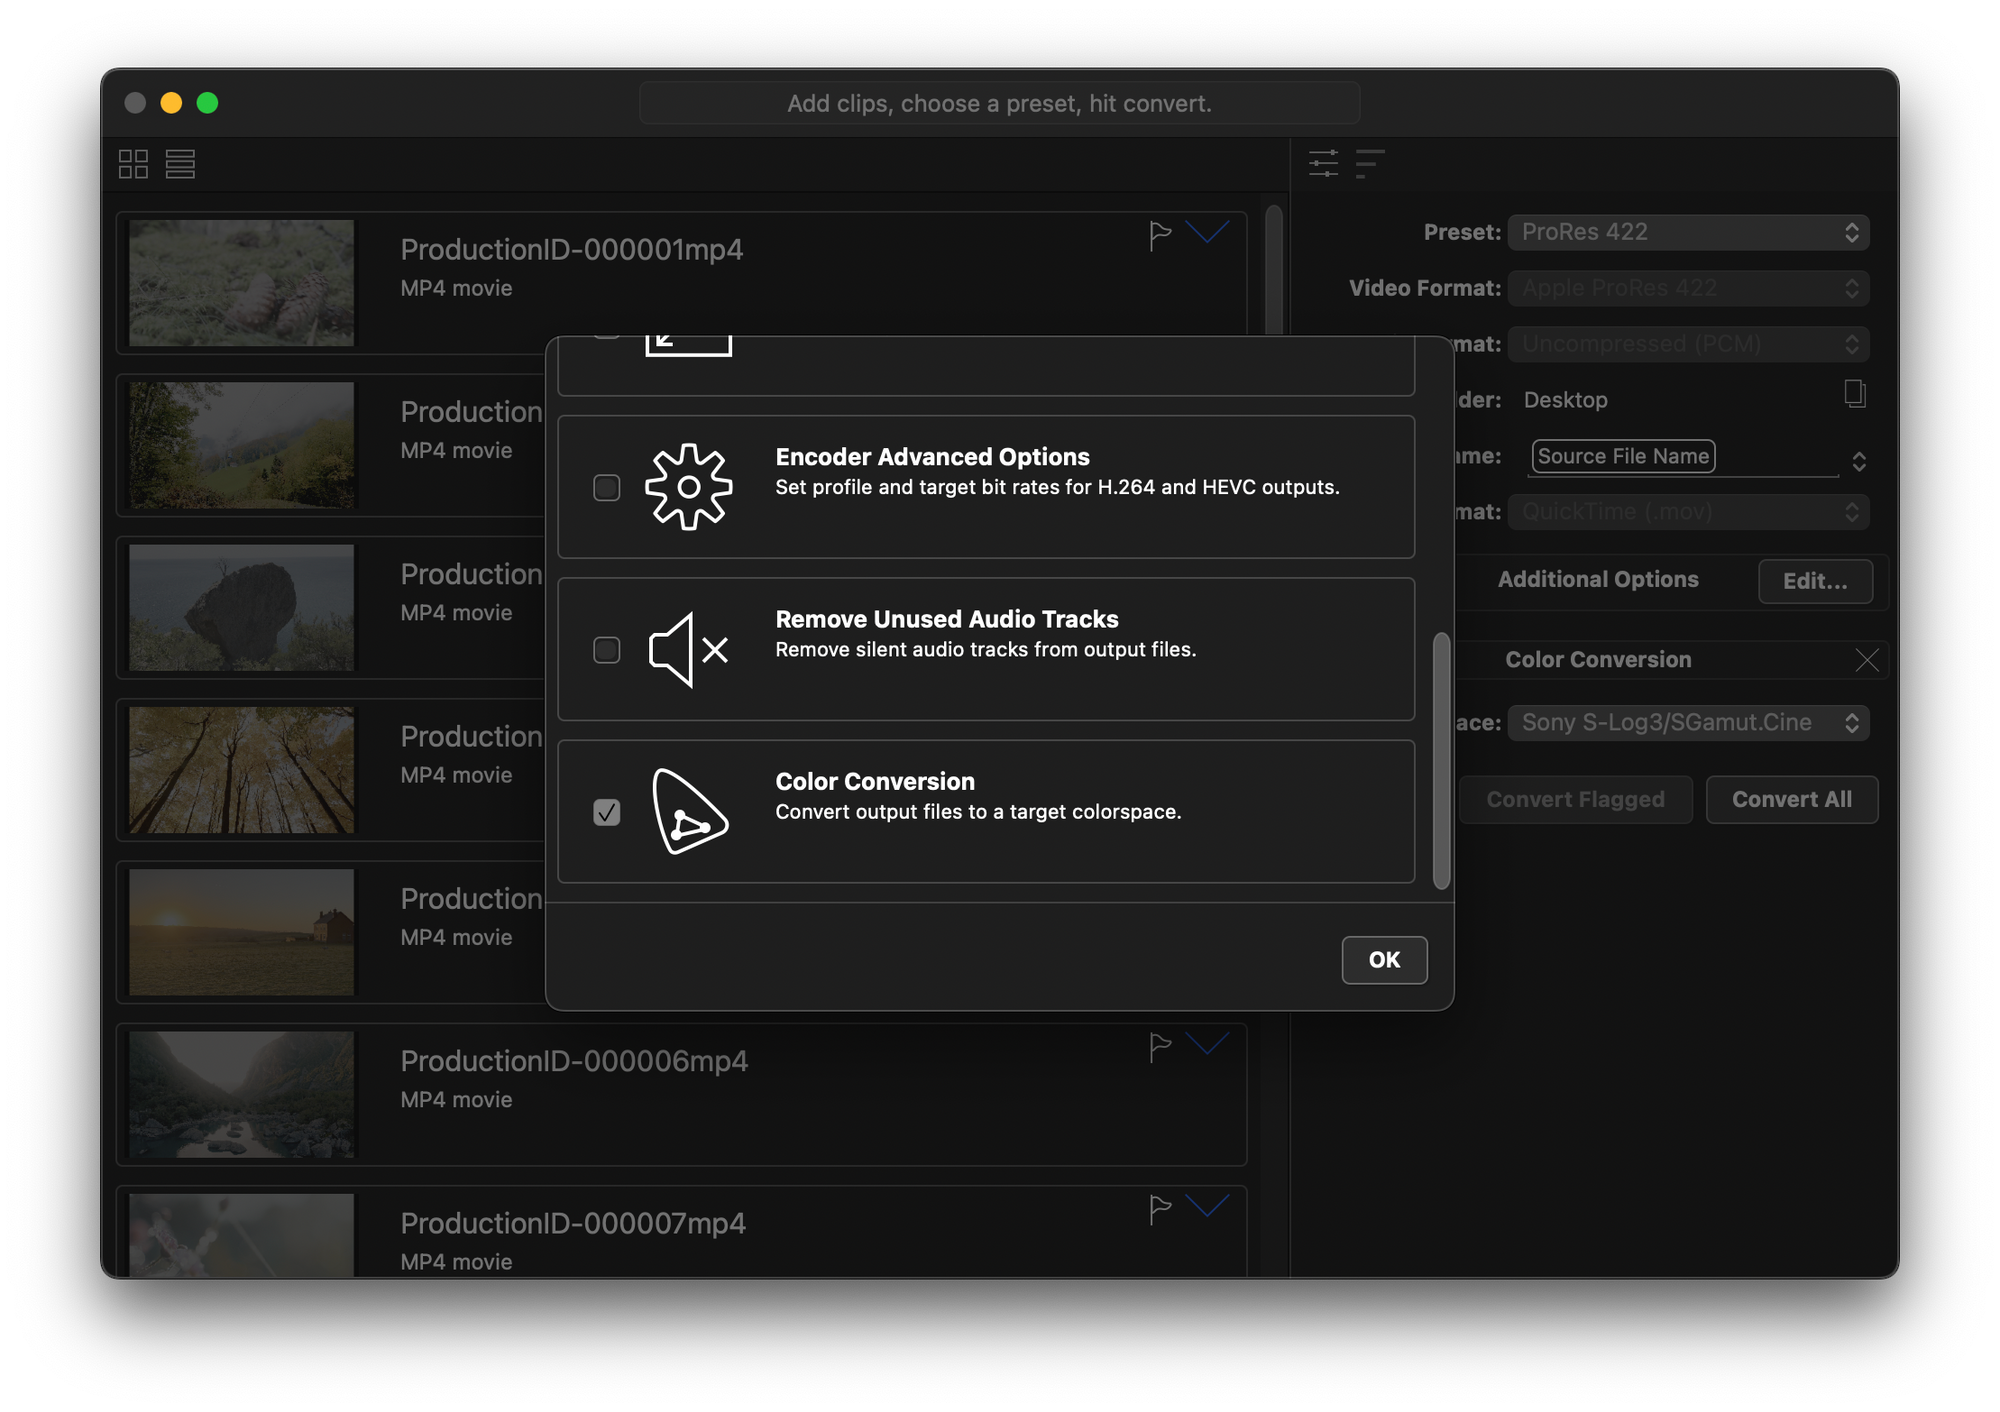
If you're shooting in RAW, or clients bring their RAW footage to you for editing, you'll need to make edit-friendly versions unless you're committed to the cumbersome option of an all-RAW workflow. The new color conversions options (available through the color conversion panel) let you quickly choose between Rec709 (SDR) and PQ or HLG (HDR). EditReady converts any RAW format into these video standards automatically, without you having to worry about camera gamma or gamut settings. Nor do you have to find the correct output LUTs for each camera make and model, because we do that for you.
Applying the LUT after a color space conversion matters, because if a director has chosen a look on-set, their LUT will only be valid as long as the video remains in the same color space. When the video is converted, any previously-applied LUT will be distorted, making the image look wrong. The way to avoid this is to let EditReady convert the original LUT-free video and apply the appropriate LUT after the conversion. This two-step process is a foolproof way to carry LUTs through the workflow without nasty surprises.
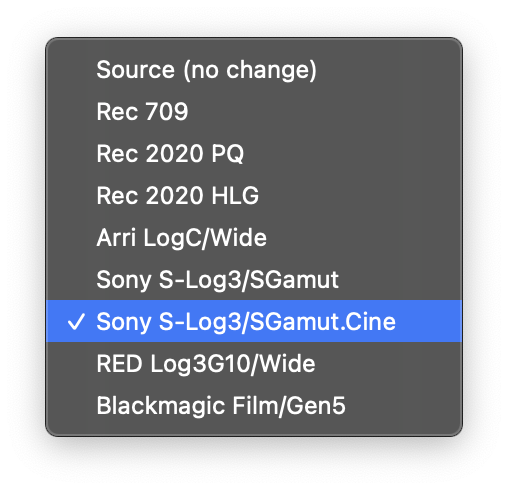
For example, if you have a specific look in mind (maybe you love the look of ARRI's Rec709 LUT), you can choose ARRI LogC/Wide Gamut as your output format and then select the ARRI LUT.
Most of the time, you'll want to create new mezzanine files to replace your RAW footage for the whole project. You can choose industry-standard HDR, PQ, or target a vendor log format to maintain a wide dynamic range for flexibility in editing and grading.
EditReady will convert any RAW footage from ARRI, Sony, RED, or Blackmagic, into your chosen colorspace before applying the LUT. Doing it the other way round would distort the effect of the LUT during the colorspace conversion. So you get the result you expect, no matter the source file. It's a nasty trap to fall into, and we've eliminated that danger for EditReady users.
What if you don't specify an output colorspace or apply a LUT? In that case, it's all good, too: EditReady will continue to read the RAW file's metadata and apply any embedded LUTs and color transforms specified on-set.
Accuracy
The recent improvements in color post-production workflows couldn't have happened without extra accuracy, dynamic range, and processing precision. That's why EditReady's new color conversion pipeline is designed from the ground up to be in high precision floating point mode and adheres to vendor-specific color models. We've also hand-tuned it to fully use Apple's Metal architecture.
We've infused our new color awareness into every aspect of EditReady. You'll get more accurate colors in video overlays, better blending, and more precise scaling. You'll be able to use LUTs designed for any camera or color model and get the results you'd hope for and expect.
Sony RAW and X-OCN
Sony has a long history with RAW digital cinematography. In 2011, the company's ahead-of-its-time F65 had an all-RAW workflow, but for mere mortals, it was nearly impossible to use in production. The amount of storage required was huge, as Sony's F65 RAW was uncompressed, and at the time, there were very few tools to deal with it.
Then, in 2017, Sony announced a new camera at a press conference in Pinewood Studios: Venice. (To be honest, we were surprised the camera wasn't called "Basingstoke", after the town where Sony Professional has its European headquarters, but that's marketing for you.) Venice is also a high-end cinema camera, but one with a far more practical workflow and has proven to be a smash hit amongst DPs.
But any RAW workflow still is a time and resource-hog.
Most of the time, the priority is to get the project finished. That's where Sony made its biggest move: with the release of Venice, it revealed it supported the new X-OCN codec: compressed RAW, without compromise. Released only the year before with the AXS-R7 4K Raw Recorder, X-OCN was originally targeted at the F5 and F55 cameras, but turned out it was a perfect fit for Venice.
EditReady now takes both the original Sony RAW and the much newer X-OCN codecs and converts them into more manageable files. X-OCN saves between 30% and 60% compared to the original RAW media. They’re still bulky files, though, so a perfect candidate for Editready and its new Color Conversion workflow.
As with all codecs in EditReady, we're using Sony’s own color models and do all calculations with floating-point accuracy. It's the best way, and for us, the only way.
Finally
Color is now an intrinsic part of almost any workflow. So it’s an added dimension to your work, and it needs to be done right.
With the new EditReady, you can take RAW video files from a wide selection of cameras and convert them into a quick and easy NLE-friendly format, keeping as much of the original look and feel of the material as possible.
There's a family resemblance between Hedge's products: they all make workflows better, doing it with care and precision, via a fantastic user interface, and wrapping it all in industry-leading support.
Want to try out the new EditReady? It's available for download here.
Explainer 1: What's a mezzanine format?
A mezzanine is a codec or video format that's easier to work with than camera files. Popular mezzanine files include Apple ProRes and Avid DNx. They're designed to be edit and processor friendly while still looking good to a post-production professional: good enough for editing and often basic color grading. You may have been using mezzanine files for years without knowing it: it's just a term, and it's not used by everyone.
Important to understand though is that a mezzanine file is not the same as a proxy file. Mezzanines can be proxies, but not all proxies are mezzanines. Where proxies require original media to deliver an edit, a project can be finished using just mezzanines as long as they’re of good enough quality for the delivery medium.
Proxies are essentially the Minimum Viable Product of the video editing world. They're extremely small, and you wouldn't use them for finishing or mastering, but they're handy for editing because they're frame-accurate and good enough to see colors, composition, and audio sync. For example, mezzanine files are typically one-sixth of the original file size, but proxies can be one-fiftieth the size or even smaller.
You can also call a mezzanine file a proxy, because it is absolutely correct to say that it "stands in" for the original file. It's just that in the era of cloud editing and remote working, a proxy is typically a version of the original file that's optimized for smallness.
Mezzanine files arrived on the scene when cameras started to use Long-GOP compression formats like H.264 to fit more video onto the storage available at the time. These codecs were originally delivery formats and were extremely highly compressed. They encode some frames and calculate the rest based on adjacent groups of frames (GOPs). While these Long GOP formats were capable of surprisingly good quality, they were distinctly not edit-and-processor-friendly. Decoding to get a picture from a Long-GOP codec takes a lot of work, and editors working with these new formats found their computers slowing to a crawl. As a result, playing more than one video track was often impossible.
Mezzanine files fix this by being extremely efficient to decode. They trade between size (they're much bigger than Long-GOP files) and speed. A mezzanine file is like a painting rolled up for transport and stored in a cardboard tube. When you take it out and unroll it, it's easy, and the result is virtually as good as the original. But with a Long GOP file, you have to fold the picture many times and wrap it in a parcel with multiple layers of tape. It fits into a much smaller space, but it's extremely tough to unwrap it and flatten out the creases. That translates into a resource-hog that's slow to work with.
Another advantage of mezzanine files is that they are a lingua franca: a widely supported format that almost anyone can use, and that you can convert to from virtually any source.
It might not be obvious, and perhaps surprising, that mezzanine files are often bigger than the original camera file. That's usually the case when the original file is H.264, and the mezzanine is ProRes or DNx. So it's not the size that matters, it's the effort it takes to unpack it from its compressed state, and ProRes and DNx unpack very easily compared to the Long GOP formats.
Some more mezzanine benefits:
- They're self-contained (with no sidecar files or split audio and video)
- They're optimized for editing (debayered, not RAW, intraframe and not interframe (i.e. Long GOP))
- They work in virtually all video software (Some MAMs and NLEs don't recognize some formats)
The only real downside? Having to convert all your incoming camera files to mezzanines. That's where EditReady comes in. Equipped to deal with almost every current camera file format, it's not only quick but simplifies your post-production workflow. And now, with Color Awareness streamlining color workflows, it's not only fast but helpful, too.
Explainer II: Rec 709, PQ and HLG
Rec709 is a standard for SDR HD TV signals. It's designed to give a colorful and contrasty-looking picture on most displays and hails back to when CRTs were the dominant type of screen. With a range of only about 6.5 to 7.0 camera stops, it doesn't seem much compared to today's HDR monster cameras with 12 or even 15 stops. But everyone is used to Rec709, and it is still a sensible default for any production that's not specifically going to be graded and finished in HDR.
PQ stands for Perceptual Quantization and is the basis for Dolby Vision. Like the other HDR options in EditReady, it's a technique (a "transfer function" in tech-speak) that maps our eyes' highly non-linear response to brightness onto the linear encoding of digital video, making better use of the available bits to allow for more detail in the shadows, where it's needed, and less in highlights, where it's not.
Since each color channel has a wider dynamic range, HDR allows for brighter and more intense colors, too. Note that while the signal may be encoded for wider color, the final appearance of the images remains a function of the display's capabilities.
HLG is another HDR transfer function that was jointly developed by the BBC and NHK and is compatible with SDR and HDR displays.
PQ is a good choice where you know the display's characteristics in advance; HLG is a great compromise for HDR material where you have no knowledge or control over how it will be viewed.